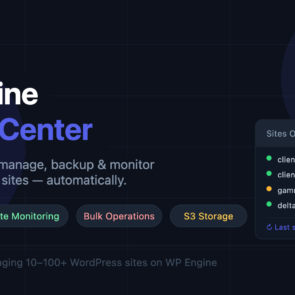
Create Account & Submit Ticket Guide

Create Account & Submit Ticket Guide

The Webfixon Customer Support Portal makes it easy to create a support ticket, view your tickets, or manage your account. Here’s a simple guide to help you get started.

1. How to Sign Up

If you’re new to Webfixon, you’ll need to sign up for an account. Follow these steps:

  • Step 1: Navigate to the Sign Up Page.
  • Step 2: You’ll see a form asking for your Name, Email, and a Captcha for verification (to ensure you’re not a robot).
  • Step 3: Enter the required information and click the Sign Up button to create your account.
  • Step 4: You’ll receive an official email from us—click the secure link to set your password and access your account.
Tip: Make sure your email is entered correctly, as this will be used for all communications regarding your tickets and account.

2. How to Sign In

If you already have an account, simply sign in to start using the support portal:

  • Step 1: Click on the Sign In button at the top right corner of the page (next to Sign Up).


  • Step 2: Enter your Email Address and Password in the fields provided.


  • Step 3: If you want to stay logged in, check the box next to Remember me.


  • Step 4: Click the Sign In button to access your account.

If you forget your password, there’s a “Forgot Password?” link that allows you to reset it.

4. How to Submit a Ticket

If you need support, follow these steps to submit a new ticket:

  • Step 1: In the My Area section of your account, click the Ticket button or go below and you will see a button called “Submit Ticket”

  • Step 2: A form will appear where you can provide the Ticket Information, including:

    • Department (choose Webfixon Support from the dropdown)

    • Subject of the issue

    • Description (details about the issue you’re experiencing)

    • Product Name (optional)

    • Priority (set the priority of the issue)

You can also attach a file up to 40MB if necessary.

Step 3: Once you’ve filled in the details, click the Submit button to send your ticket.

5. How to Track and Manage Your Open Tickets

After submitting a ticket, you can track and manage it from your My Area:

  • Step 1: Under the Views section, you will see options like My Open Tickets, My Closed Tickets, My On Hold Tickets, and My Overdue Tickets.

Step 2: Click on My Open Tickets to see all active tickets you’ve submitted. You can view their status or update any information if needed.

Conclusion

Whether you’re signing up, signing in, or submitting a ticket, the Webfixon Customer Support Portal is designed to be user-friendly and easy to navigate. By following these simple steps, you’ll be able to get the support you need in no time!

If you run into any issues or have additional questions, feel free to reach out through your support tickets or Try our Live Chat